
I’m currently in the beginning steps of learning Terraform and Ansible. After reading some of the documentation I thought I’ll learn it by building something I really want to automate myself.
Please be aware that the following is my first test where everything is in one file, but there are best practices for processes and file/folder structure.
Terraform best practice | Ansible best practice
Video
I recorded a video about the whole process if you’re interested.
Task: Automate GNS3 on bare metal
Typical use case
I’d guess most of the time GNS3 users spin up the pre-build GNS3 VM and then simulate their network. This requires nested virtualization. So you’d spin up a VM within a VM when you start a router or a switch with GNS3.
Idea: Bare metal provisioning
The idea was to find a hosting provider that offers bare metal hosting which is billed by the hour, use Terraform to spin up the server and use Ansible to configure it. I already knew how to setup a GNS3 server, so I can learn Ansible by applying what I already know from another context. I always wanted to see how GNS3 feels on real hardware.
Hosting provider
I searched for hosting providers that offer bare metal servers billed by the hour and found a few. I already had an account with Scaleway and I knew that they have a good API documentation so I went with them. (this is no sponsored post or something like that)
Learning Terraform: Spin up a bare metal server
Terraform file
The Terraform configuration is stored in a .tf file. And the first thing you have to check is if there is a provider for the cloud hosting company. Scaleway had one and it can be found in the terraform registry.
Providers are categorized as follows: Official, Partner, Community and Archived. (more info here) The Scaleway provider has Partner status, so I knew that this is most likely the official one.
Provider requirements
In the .tf file I started with the provider requirements, which looks like this:
terraform {
  required_providers {
    scaleway = {
      source = "scaleway/scaleway"
    }
  }
  required_version = ">= 0.13"
}
It would also be possible to define multiple providers so that you can manage resources for different platforms.
Provider block
Next is the provider block. This is used to configure information about my Scaleway account.
provider "scaleway" {
  organization_id = "ea8833c6-1c59-49ae-910f-f3c1efea9382"
  access_key = "a4fdafff-9fa3-47b0-87ca-da14dcf1d16d"
  secret_key = "f4250850-486b-4dec-b3d2-2695e29b40d3"
  project_id = "070051e0-97e2-4f46-ac54-cdf730f3f069"
}
(Don’t worry, I used a GUID generator for sensitive keys. I left the public ones as is)
Here you can see which arguments are supported for the provider block
To get the ID’s you have to generate an access_key and secret_key in the web interface first.
It’s not recommended to store the access and secret key in a file and then commit it to a repository, because it could leak your credentials. There are better ways like environmental variables and secret managers.
It would also be possible to work with Terraform variables here, but for simplicity’s sake, I entered the data directly.
Resource block
In the resource block I can define something like a SSD volume, a snapshot, an IP address and more. For my simple Terraform entry example there is only one resource block required that defines the bare metal server.
resource "scaleway_baremetal_server" "gns3test" {
  name = "GNS3 Server Name"
  zone = "fr-par-2"
  offer = "7e81d4d4-a84b-4dd0-9f44-f0ac34a09e3a"
  os = "96e5f0f2-d216-4de2-8a15-68730d877885"
  description = "GNS3 Description"
  hostname = "gns3"
  ssh_key_ids = [
    "21e49a24-61a0-4a31-8d32-031857189469",
    "148df0ce-0e56-44eb-b397-acfa484681c7" ]
}
name is just the custom name of the server and how it shows in the web interface and in the API output
There is a Scaleway zone I had to chose. I used Paris 2, but there is also Amsterdam or Paris 1.
The offer is the exact server offer. You can also see this in the web interface or the Scaleway product page. More on that later.
You define the os (operating system) that should run on your server.
There is a mandatory description you have to provide.
I also set my hostname
My ssh_key_ids were already stored in the backend. You need one of those to access the server.
Get (server) offer ID
As you can see the resource block requires references in a GUID format. Sometimes you see the GUIDs in the Scaleway web interface. Like the ones for your ssh keys or your project IDs.
With this key and secret you can now query the API, which can be done with curl for example. We now want to get the offer ID.
curl -X GET \
  -H "X-Auth-Token: $SCW_SECRET_KEY" \
  "https://api.scaleway.com/baremetal/v1/zones/fr-par-2/offers"
This outputs a long list of bare metal servers and you have to find the one you’re looking for. I wanted to test EM-I210E-NVME, which looks like this in the web interface
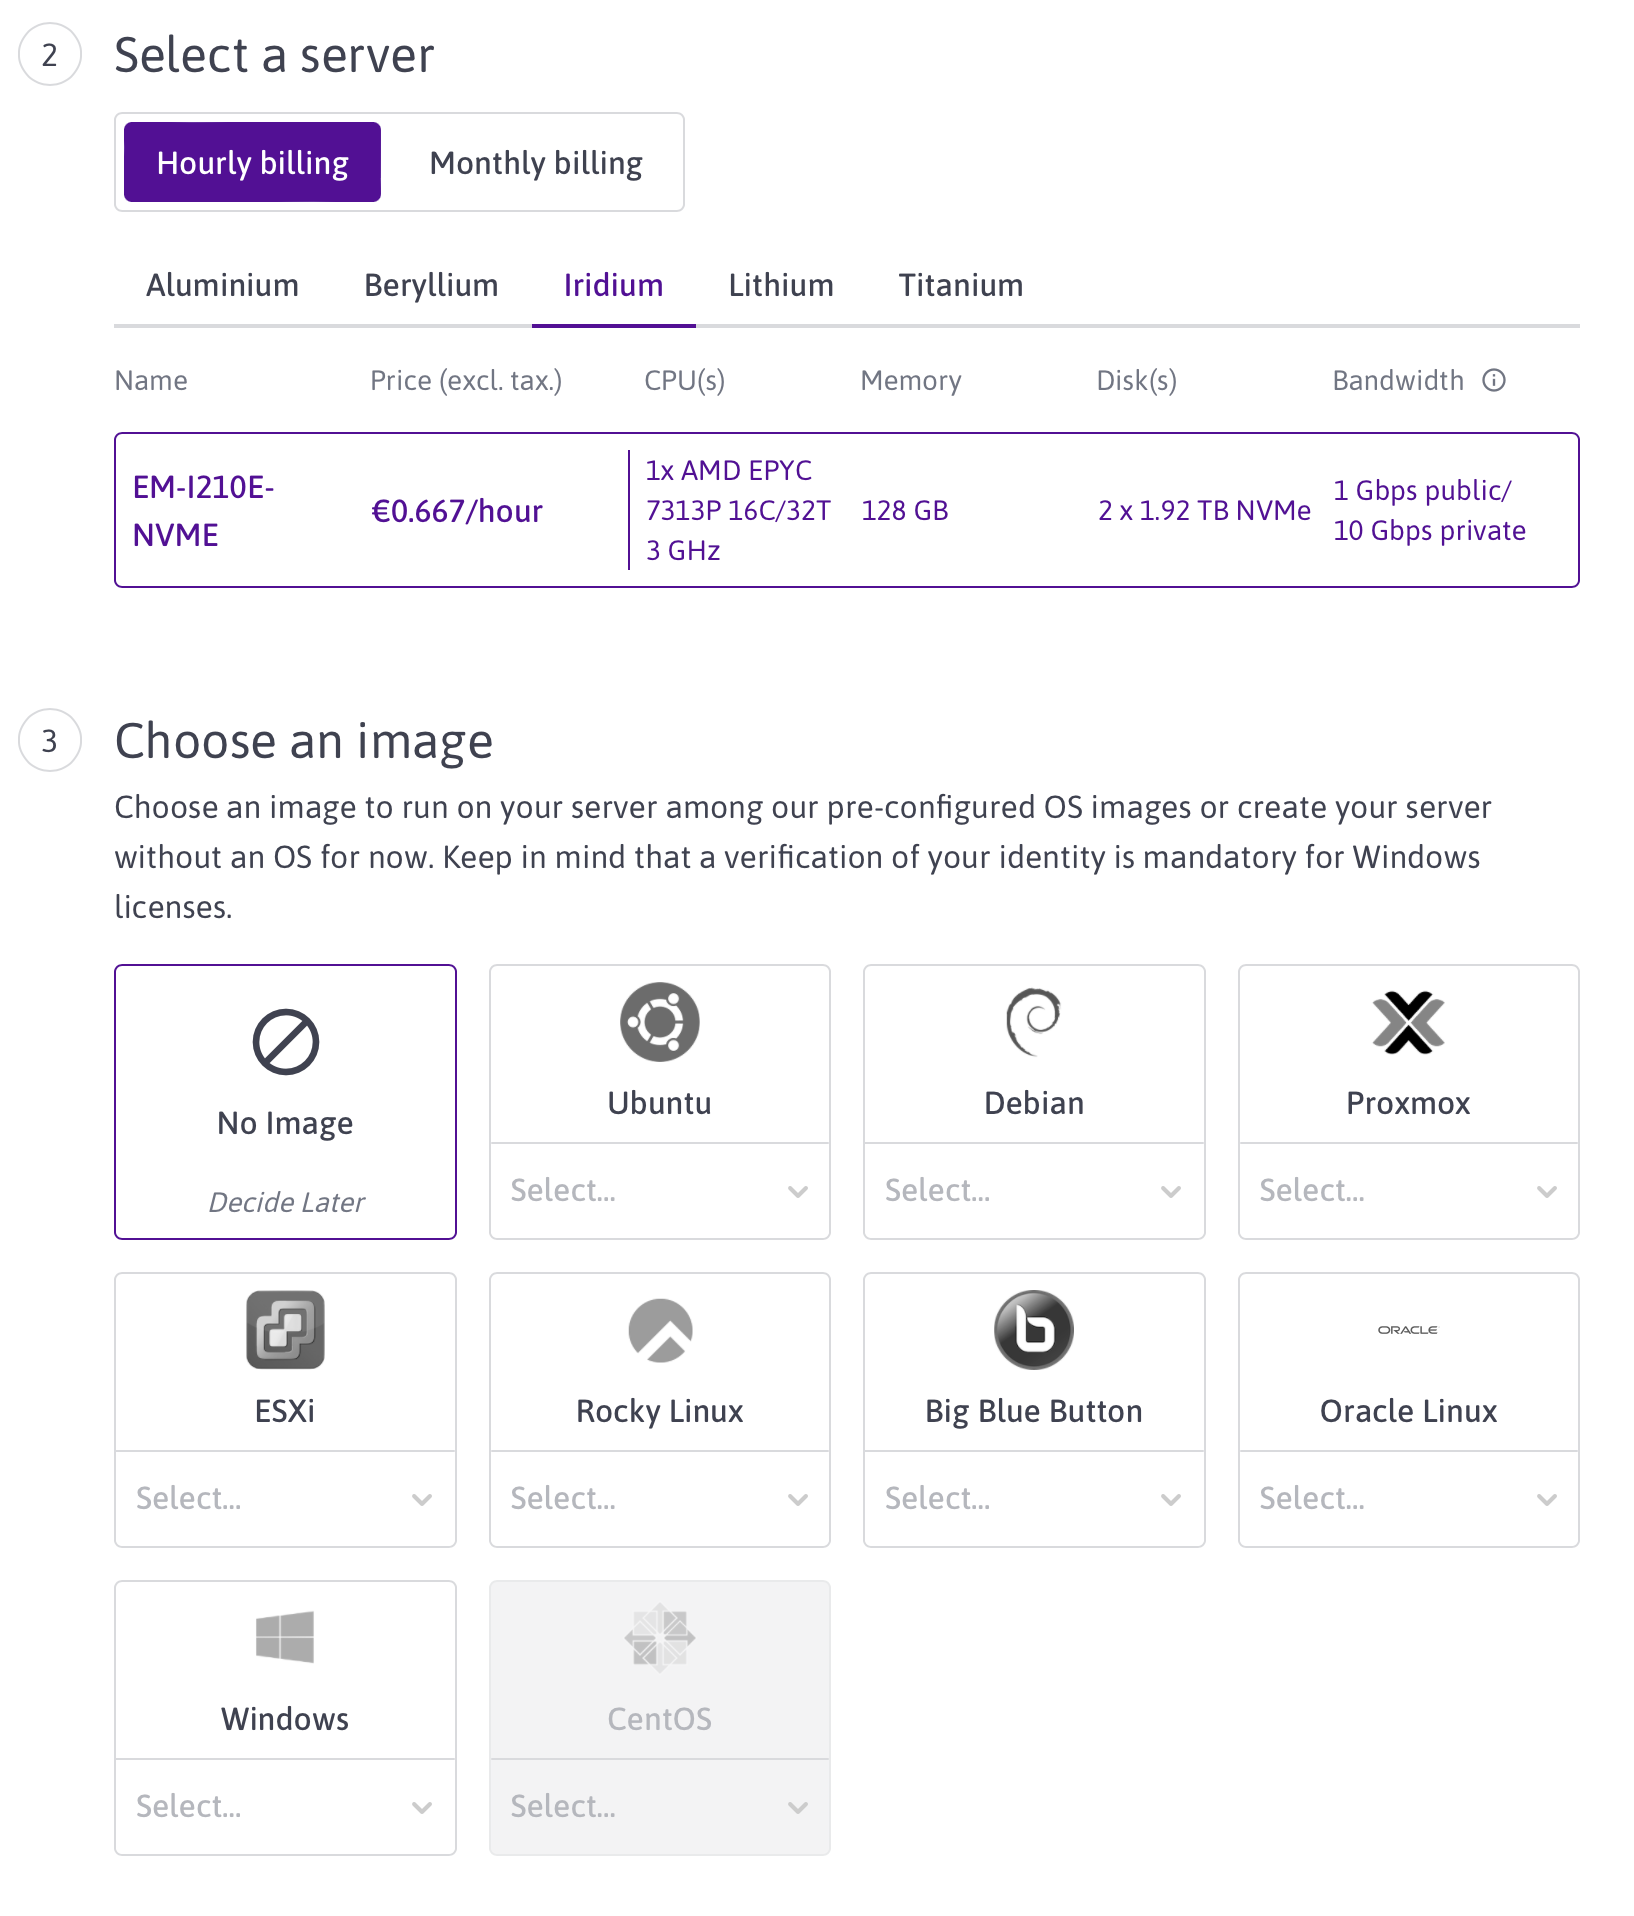
This is the API output for this server:
"id": "7e81d4d4-a84b-4dd0-9f44-f0ac34a09e3a",
"name": "EM-I210E-NVME",
"stock": "available",
"bandwidth": 1000000000,
"commercial_range": "iridium",
"disks": [
  {
    "capacity": 1920000000000,
    "type": "NVMe"
  },
  {
    "capacity": 1920000000000,
    "type": "NVMe"
  }
],
"enable": true,
"cpus": [
  {
    "name": "AMD EPYC 7313P",
    "core_count": 16,
    "thread_count": 32,
    "frequency": 3000,
    "benchmark": ""
  }
],
"memories": [
  {
    "capacity": 128000000000,
    "type": "DDR4",
    "frequency": 3200,
    "is_ecc": true
  }
],
"quota_name": "EM_I210E_NVMe",
"price_per_hour": {
  "currency_code": "EUR",
  "units": 0,
  "nanos": 667000000
},
"price_per_month": null,
"persistent_memories": [],
"raid_controllers": [],
"incompatible_os_ids": [
  "d17d6872-0412-45d9-a198-af82c34d3c5c",
  "f2aeab5d-6015-4b7c-b4ed-d76e89093621",
  "8a83777f-6dc1-476a-8d0c-d8b7594ecb6f"
],
"subscription_period": "hourly",
"operation_path": "",
"fee": {
  "currency_code": "EUR",
  "units": 0,
  "nanos": 0
It’s important to double check the subscription_period, because it can also be monthly.
We need "id": "7e81d4d4-a84b-4dd0-9f44-f0ac34a09e3a" for our resource block.
Get operating system ID
Next we need the operating system. Same procedure, different API URL:
curl -X GET \
  -H "X-Auth-Token: $SCW_SECRET_KEY" \
  "https://api.scaleway.com/baremetal/v1/zones/fr-par-2/os"
It lists all the available operating systems, the one I’m looking for is Ubuntu 22.04 LTS
"id": "96e5f0f2-d216-4de2-8a15-68730d877885",
"name": "Ubuntu",
"version": "22.04 LTS (Jammy Jellyfish)",
"logo_url": "https://baremetal-logos-fr.s3.fr-par.scw.cloud/ubuntu.png",
"ssh": {
  "editable": false,
  "required": true,
  "default_value": null
},
"user": {
  "editable": false,
  "required": false,
  "default_value": "ubuntu"
},
"password": {
  "editable": false,
  "required": false,
  "default_value": null
},
"service_user": {
  "editable": false,
  "required": false,
  "default_value": null
},
"service_password": {
  "editable": false,
  "required": false,
  "default_value": null
},
"enabled": true,
"license_required": false,
"allowed": true
Here we get the "id": "96e5f0f2-d216-4de2-8a15-68730d877885"
SSH key ID
You can also add your SSH keys via API, but I already had them stored before, so I just did a request to get the IDs
curl -X GET \
  -H "X-Auth-Token: $SCW_SECRET_KEY" \
  "https://api.scaleway.com/iam/v1alpha1/ssh-keys"
The output looks like this, without my data
{
  "ssh_keys": [
    {
      "id": "string",
      "name": "string",
      "public_key": "string",
      "fingerprint": "string",
      "created_at": "string",
      "updated_at": "string",
      "organization_id": "string",
      "project_id": "string",
      "disabled": "boolean"
    }
  ],
  "total_count": "integer"
}
Copy the ID and use it for the resource block.
So now we have everything that is required for the resource block.
Initialize Terraform
We now have everything we need to provision the server with Terraform.
terraform {
  required_providers {
    scaleway = {
      source = "scaleway/scaleway"
    }
  }
  required_version = ">= 0.13"
}

provider "scaleway" {
  organization_id = "ea8833c6-1c59-49ae-910f-f3c1efea9382"
  access_key = "a4fdafff-9fa3-47b0-87ca-da14dcf1d16d"
  secret_key = "f4250850-486b-4dec-b3d2-2695e29b40d3"
  project_id = "070051e0-97e2-4f46-ac54-cdf730f3f069"
}


resource "scaleway_baremetal_server" "gns3test" {
  name = "GNS3 Server Name"
  zone = "fr-par-2"
  offer = "7e81d4d4-a84b-4dd0-9f44-f0ac34a09e3a"
  os = "96e5f0f2-d216-4de2-8a15-68730d877885"
  description = "GNS3 Description"
  hostname = "gns3"
  ssh_key_ids = [
    "21e49a24-61a0-4a31-8d32-031857189469",
    "148df0ce-0e56-44eb-b397-acfa484681c7" ]
}
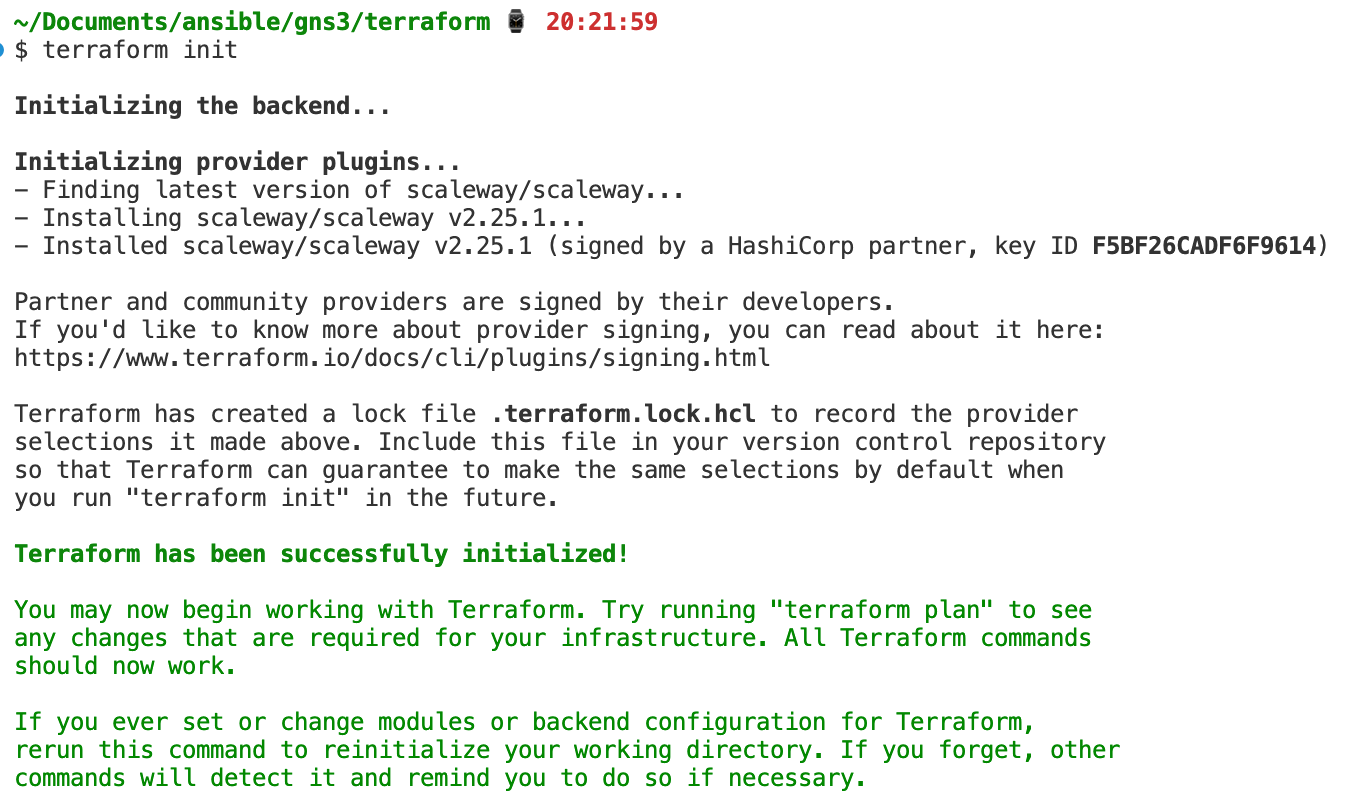
With terraform init we can initialize the working directory, which then also pulls all the provider information, which allows code completion with different IDEs like Visual Studio Code.
This is how it looks when you first execute terraform init
Apply: Create the server
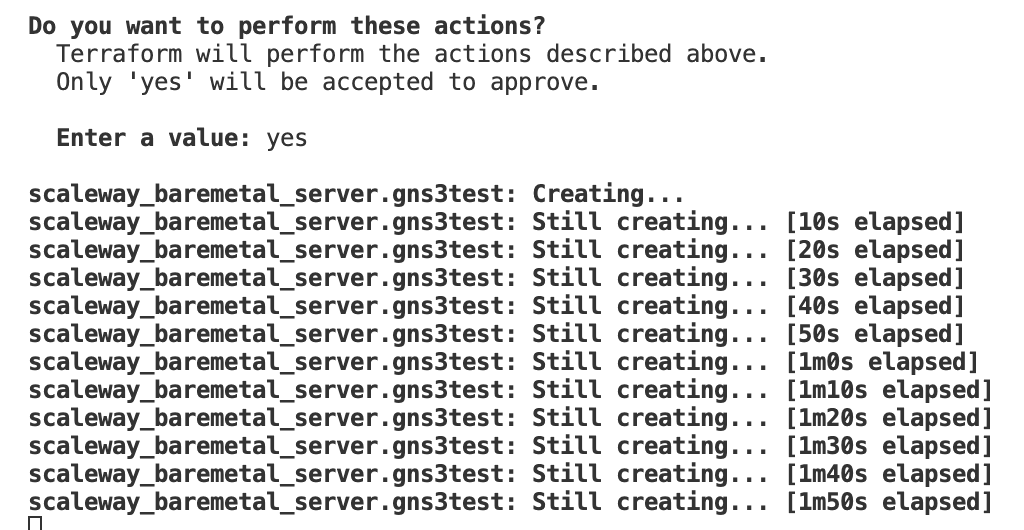
With terraform apply you start the process:
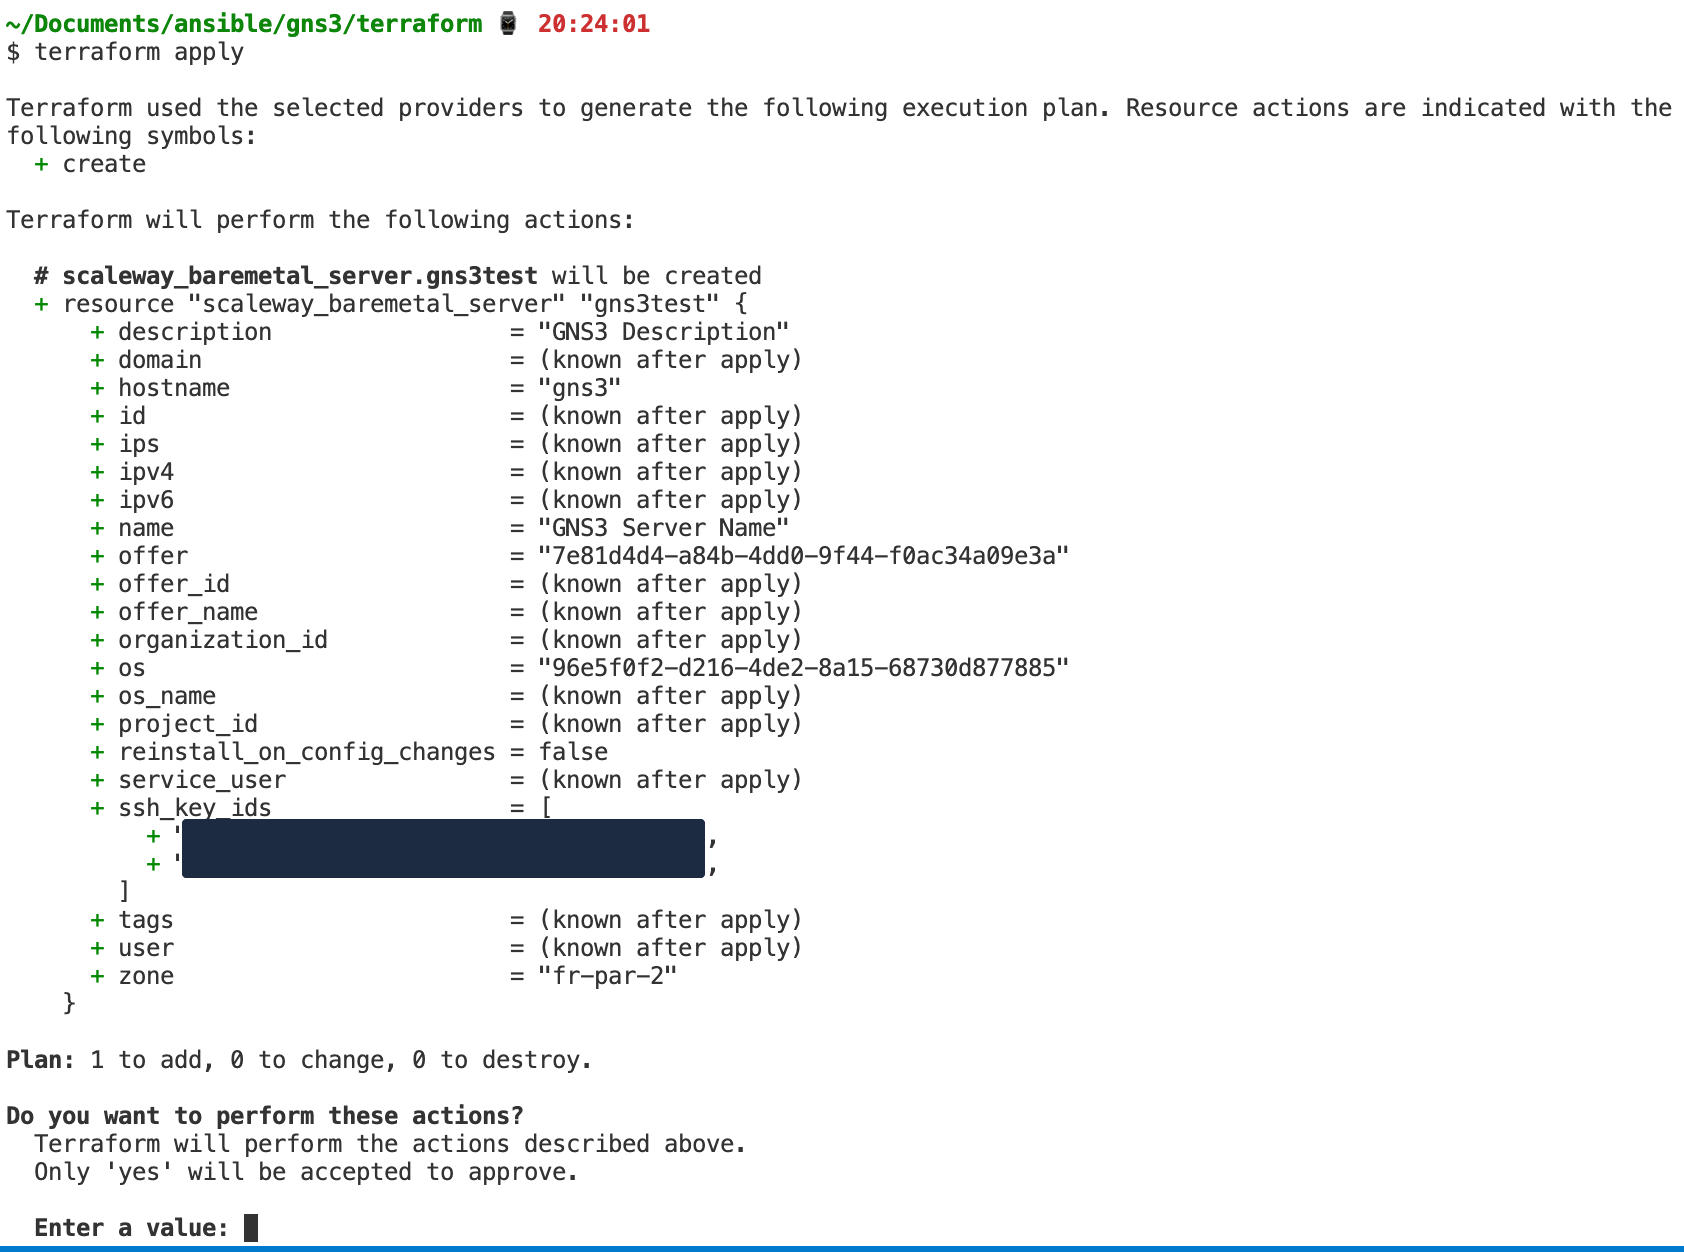
Then it loops until the server is confirmed provisioned.
When all of this is finished you can see the state in the terraform.tfstate file. This now has the actual values like your IPv4 and IPv6 addresses.
How cool is that? Just by having this terraform file I can spin up a bare metal server anytime I want with just one command.
And if I want to change anything about the server later, I can make edits in the terraform file and it gets applied with a new terraform apply. When I don’t need the server anymore I can delete it with terraform destroy.
But this new server I created is empty. This is where Ansible comes into play.
Learning Ansible: Install GNS3 server on a fresh host
We could make it so that Terraform feeds into Ansible so that everything is just one step, but I think for the first learning steps it’s better to have it separated.
Now I want to automate the steps I did manually before to deploy a GNS3 server. For this I wrote an Ansible playbook.
Inventory
In my video I talk more about what each step does, but for this small playbook it’s just important to know that there is a file with host IP addresses or hostnames which is called an inventory.
Because my hosts file is too small, I use the example from the Ansible docs so you get a better picture.
mail.example.com

[webservers]
foo.example.com
bar.example.com

[dbservers]
one.example.com
two.example.com
three.example.com
With this we can target webservers and dbservers and provision them how we like.
Here for my GNS3 server I had just one IPv4 address. But I could have easily deployed this on more servers with more hosts in the file.
Playbook file
---
- name: GNS3 for bare metal KVM
  hosts: main
  remote_user: ubuntu
  become: yes
  vars:
    allowedip: 93.206.201.141
In the beginning we define which hosts we want to target. From the example above this would be webservers and dbservers. For me it was just main.
Then we define the remote_user which is the existing user on the remote system. We have to make sure that we can access the remote server via ssh.
With become: yes we allow Ansible to use sudo privileges (root) to do the tasks. For this one we have to make sure that we don’t need to enter the sudo password on the remote system by executing visudo and add the line gns3 ALL=(ALL) NOPASSWD: ALL. Alternatively we can provide a sudo password with Ansible.
With vars we can define variables that can be used later. Here I used the public source NAT IP from my home router that should be allowed to access the host later.
Next you define the tasks. You can have multiple tasks sections in one playbook (for example one task for the webservers and one for the database servers).
Here are 3 examples from my playbook:
apt install
- name: Install base prerequisites
  ansible.builtin.apt:
    pkg:
      - gnupg
      - iptables
      - iptables-persistent
      - neofetch
this is the equivalent of apt install gnupg iptables iptables-persistent neofetch (with some parameters to have it silent without confirmation)
create user
- name: Add GNS3 user
  ansible.builtin.user:
    name: gns3
    home: /opt/gns3
    shell: /bin/bash
this creates the user gns3 with the home directory /opt/gns3 and shell /bin/bash.
add iptables (with variables)
- name: iptables Restrict traffic to only one IP
  ansible.builtin.iptables:
    chain: INPUT
    jump: ACCEPT
    source: "{{ allowedip }}"
    in_interface: "{{ ansible_default_ipv4.interface }}"
We defined {{ allowedip }} at the beginning, so it just uses the value we provided.
{{ ansible_default_ipv4.interface }} is a variable that is filled by data that is gathered by Ansible when it connects to the remote host. So called “facts”. You can read more about it here in the main docs.
For this example I used the second variable to get the name of the interface that holds the default IPv4 address to allow traffic for a specific IP.
The complete playbook looks like this
---
- name: GNS3 for bare metal KVM
  hosts: main
  remote_user: ubuntu
  become: yes
  vars:
    allowedip: 93.206.201.141


  tasks:

  - name: Update apt cache
    ansible.builtin.apt:
      update_cache: true

  - name: Install base prerequisites
    ansible.builtin.apt:
      pkg:
        - gnupg
        - iptables
        - iptables-persistent
        - neofetch

  - name: iptables Allow related traffic
    ansible.builtin.iptables:
      chain: INPUT
      jump: ACCEPT
      match: conntrack
      in_interface: "{{ ansible_default_ipv4.interface }}"
      ctstate:
        - ESTABLISHED
        - RELATED

  - name: iptables Restrict traffic to only one IP
    ansible.builtin.iptables:
      chain: INPUT
      jump: ACCEPT
      source: "{{ allowedip }}"
      in_interface: "{{ ansible_default_ipv4.interface }}"

  - name: iptables DROP all other traffic on public NIC
    ansible.builtin.iptables:
      chain: INPUT
      jump: DROP
      in_interface: "{{ ansible_default_ipv4.interface }}"

  - name: store iptables for reboot
    ansible.builtin.shell:
      cmd: iptables-save > /etc/iptables/rules.v4

  - name: Add GNS3 user
    ansible.builtin.user:
      name: gns3
      # this also creates the folder
      home: /opt/gns3
      shell: /bin/bash

  - name: Copy gns3.service systemd unitfile
    ansible.builtin.copy:
      src: "files/gns3.service"
      # also creates the directory
      dest: /lib/systemd/system/
      owner: root
      group: root
      mode: 0755

  - name: Copy gns3_server.conf
    ansible.builtin.copy:
      src: "files/gns3_server.conf"
      # also creates the directory
      dest: /etc/gns3/
      owner: gns3
      group: gns3
      mode: 0700

  # legacy trusted trusted.gpg keyring behaviour https://github.com/ansible/ansible/issues/77556
  - name: add gns3 repository
    ansible.builtin.apt_repository:
      repo: ppa:gns3/ppa
      codename: "{{ ansible_lsb.codename }}"

  - name: apt upgrade
    ansible.builtin.apt:
      update_cache: true
      upgrade: yes

  - name: Install GNS3
    ansible.builtin.apt:
      pkg:
        - gns3-server
        - tigervnc-standalone-server

  - name: Docker requisites
    ansible.builtin.apt:
      pkg:
        - ca-certificates
        - curl
        #- gnupg

  - name: get docker signing key
    ansible.builtin.get_url:
      url: https://download.docker.com/linux/ubuntu/gpg
      dest: /etc/apt/keyrings/docker.asc

  # static arm64 here
  - name: add docker repository
    ansible.builtin.apt_repository:
      repo: "deb [arch=amd64 signed-by=/etc/apt/keyrings/docker.asc] https://download.docker.com/linux/ubuntu {{ ansible_lsb.codename }} stable"
      state: present

  - name: Install Docker
    ansible.builtin.apt:
      update_cache: true
      pkg:
        - docker-ce
        - docker-ce-cli
        - containerd.io
        - docker-buildx-plugin
        - docker-compose-plugin

  - name: Add gns3 user to groups
    ansible.builtin.user:
      name: gns3
      groups:
        - ubridge
        - docker
        - kvm

  - name: Enable gns3 systemd service
    ansible.builtin.systemd_service:
      name: gns3
      enabled: true
      state: started
Actually running the playbook
With ansible-playbook -i hosts playbook.yml we can execute the playbook. With an additional -v or multiple -vvv we can get more information about what is happening on the host.
Without verbosity level the output looks like this:
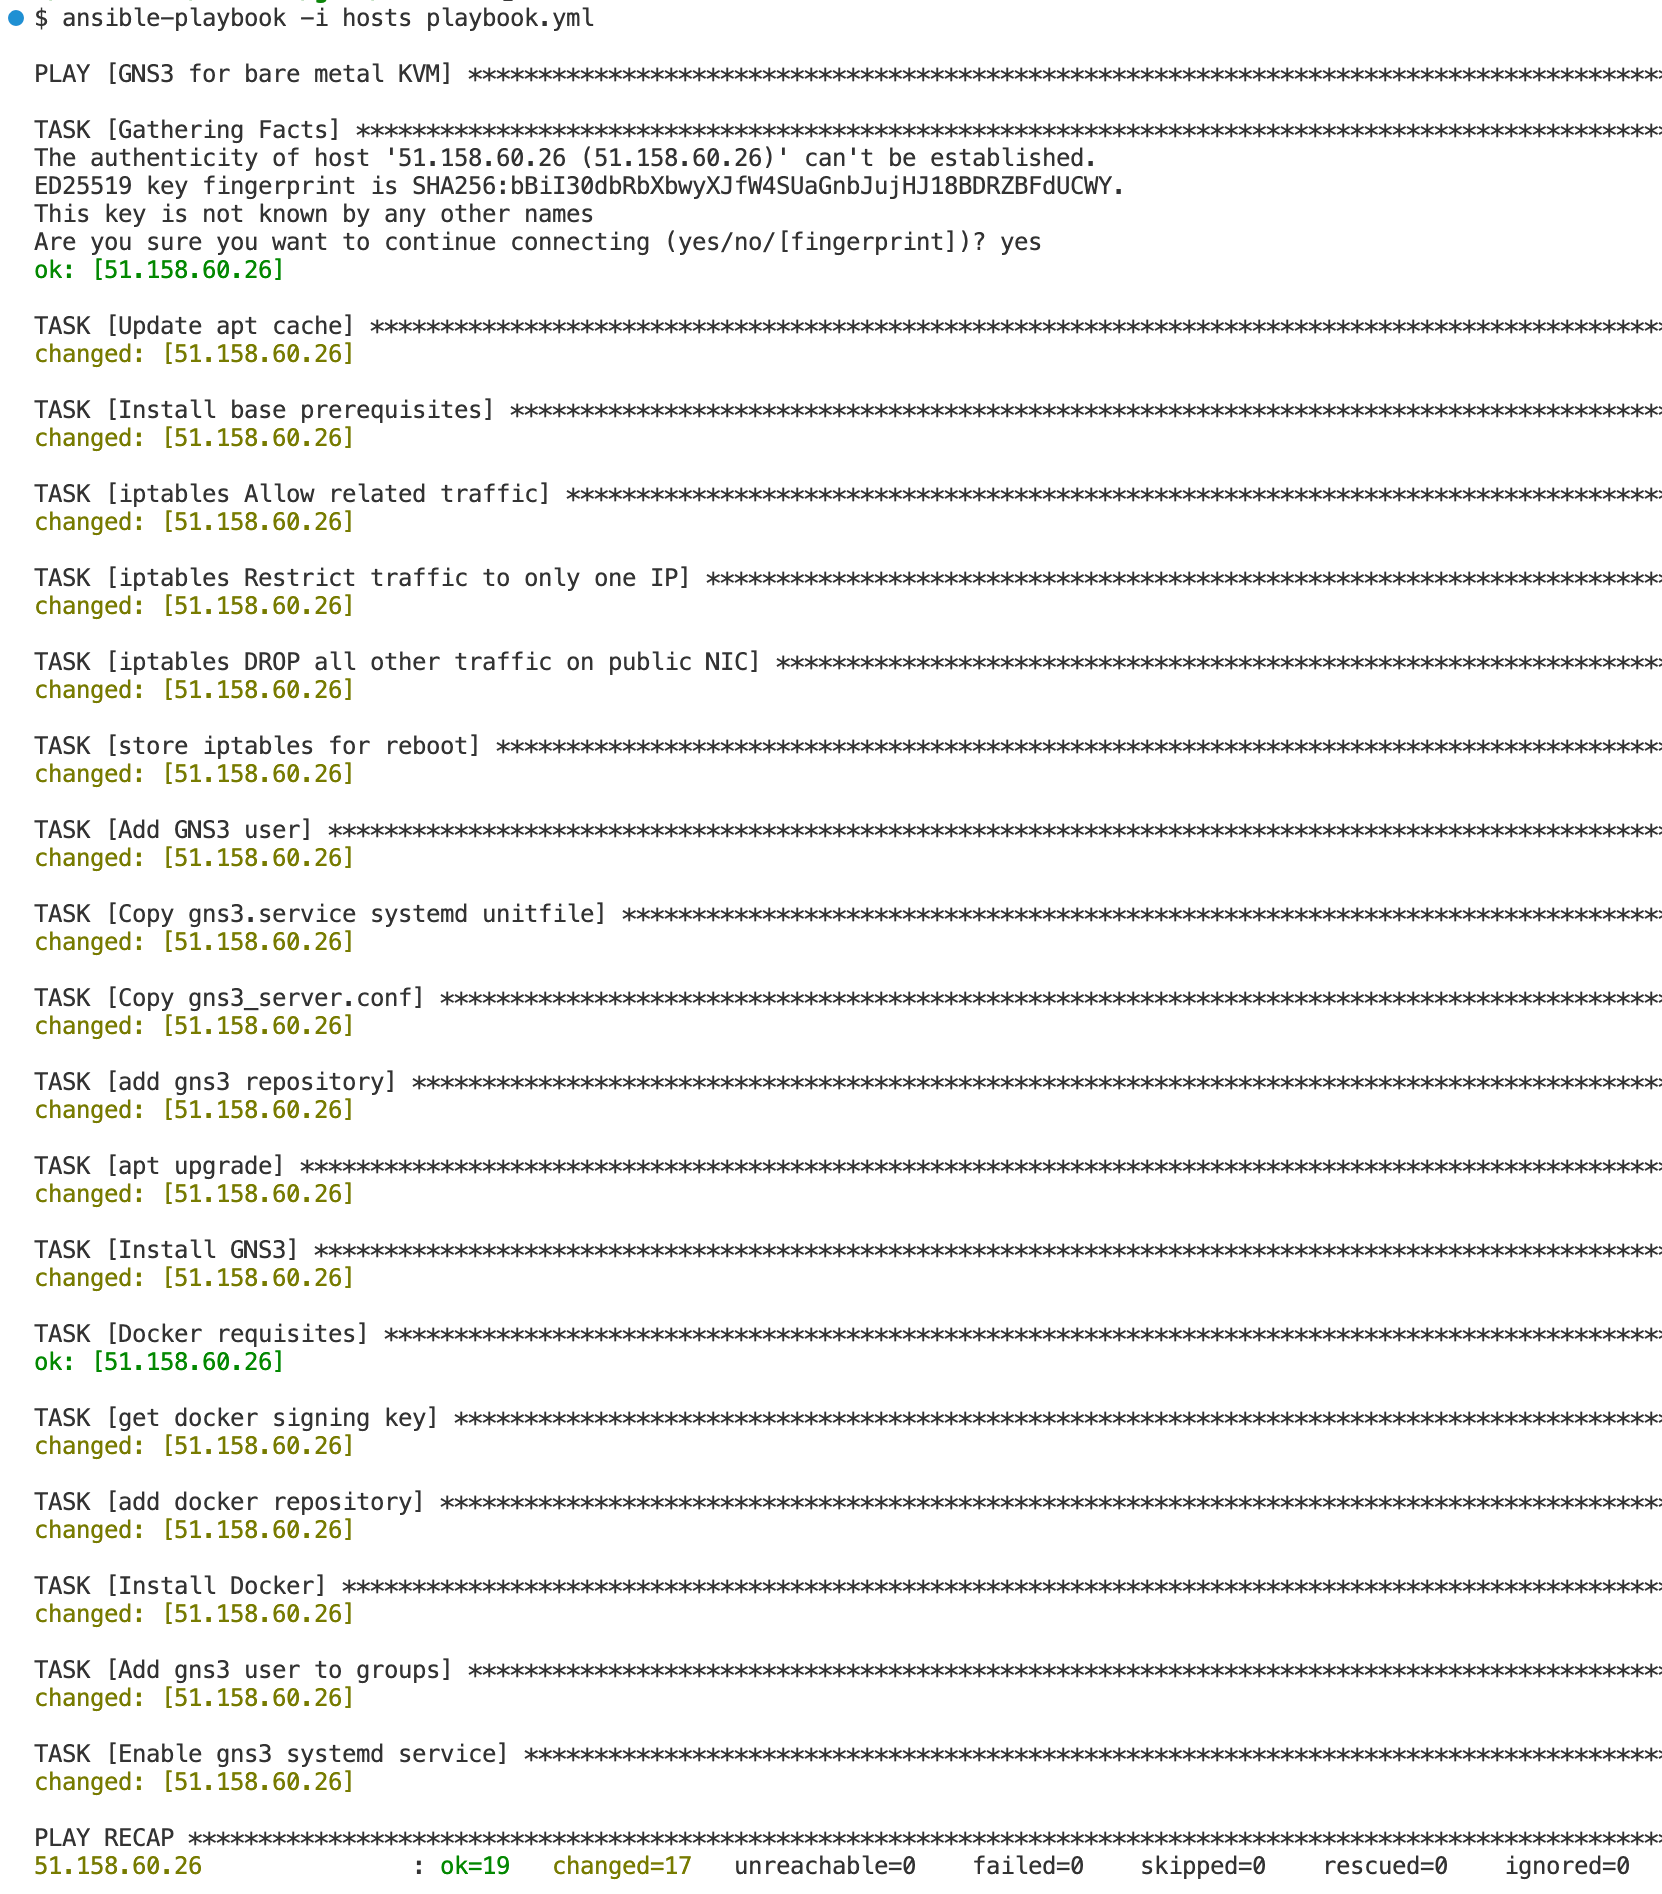
Wow, 1-3 minutes later I have a working GNS3 server. This is really nice.
We can log into the server to check if everything works like intended.
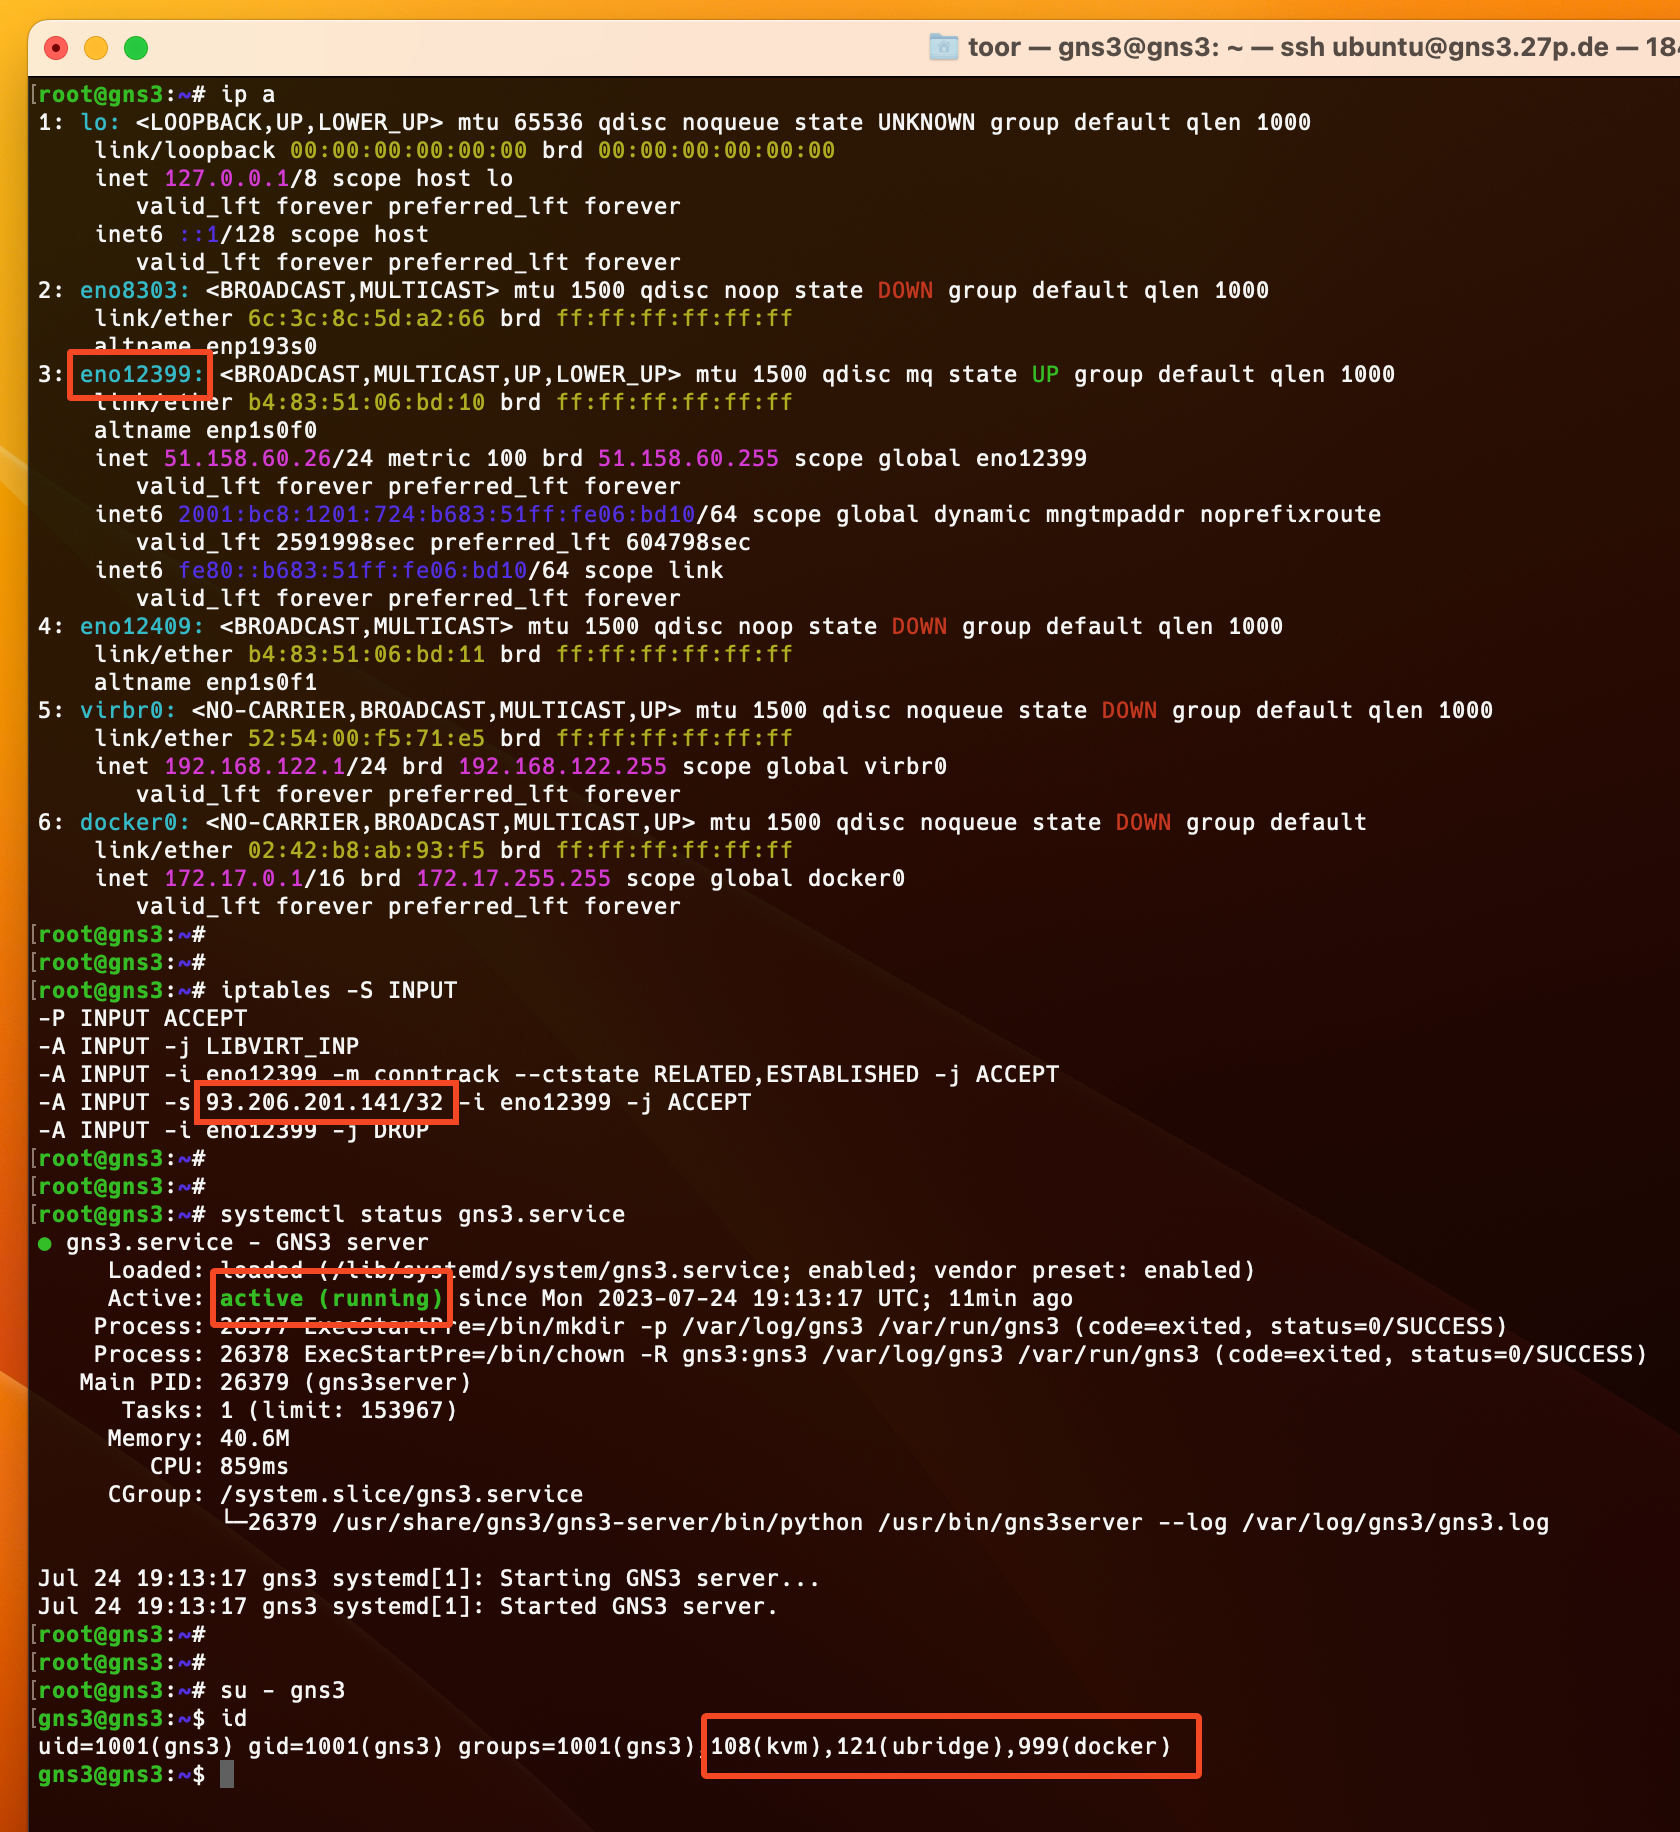
We can see that the variable {{ ansible_default_ipv4.interface }} was converted to the main IPv4 interface eno12399 for the iptables policies, which are also present. My IP address is also there to allow the traffic. The GNS3 server is started and the gns3 user has the right groups.
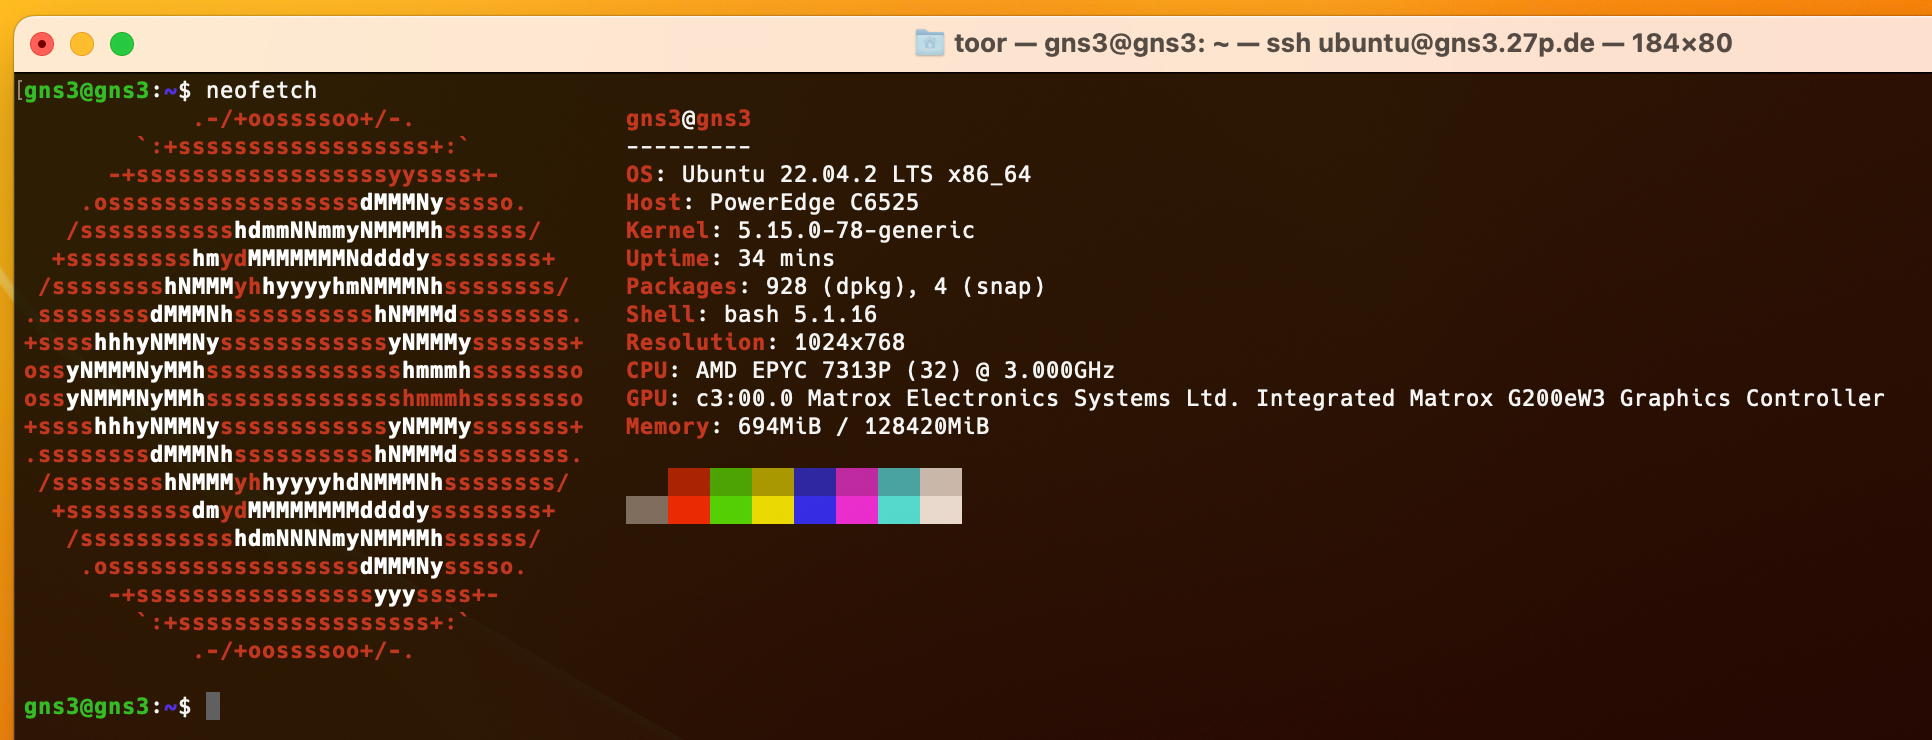
We also run a bare metal server. Yay.
That’s it. Everything is working. The next time I want to spin up a GNS3 instance I just need to execute 2 commands.
What’s next?
I’m happy with the result for now, but I also want to do another ansible playbook that pulls all the images I like to use for labbing from a remote location and also overwrite the default gns3_controller.conf so I have every image already configured.
My experience
In summary, I can say that I really enjoyed using Terraform and Ansible.
And I even wrote “code” for something I will actually use.
Just as an example, this would be a server that is good for most lab situations:

If I spin it up for 8 hours it’s 2,11€. And because I now have an automation for everything no time and money is wasted on setting it up manually 🤓