
Background info
I have videos from a few years ago where I used a video editing software to cut and export videos I recorded with a GoPro. There were limited export options available and I wasn’t very familiar with video compression, so I chose the highest setting to not make the quality worse.
This produced large H.264 video files, larger than the source video sections combined.
Storing data consumes power and costs money. I don’t like to store this data unnecessarily, so I wanted to fix what I did back then and also have a guideline for future videos.
Goal
The goal was to convert H.264 to H.265, find a decent quality setting that doesn’t waste space, but has a result where I don’t notice any difference to the original.
I’m no video codec expert, but since I found almost no information online (for Apple videotoolbox) I wanted to share what my process was to determine a decent quality setting.
tl;dr spoiler
hevc_videotoolbox quality 45-55 seems to be the sweet spot. Default quality is bad.
Output files will be here for some time

ffmpeg: Hardware vs. software encoding
Most of the times hardware encoding produces larger output files than using a software library. But hardware encoding is significantly faster. With apple silicon you can utilize videotoolbox, which ffmpeg supports.
Using a software encoder
When you software encode H.265 you usually chose a “constant rate factor” CRF. This way your main goal is to keep a specific quality regardless of the final file size/bitrate.
For different purposes like streaming with network bottlenecks “constant bit rate” CBR or “video buffering verifier” VBS can be used. But I am only interested in maintaining a decent quality here.
If I wanted to do this with software I’d use libx265 with a constant rate factor CRF. The default for H.265 is 28. Lower values have better quality.
How ffmpeg does it with Apple’s hevc_videotoolbox
With ffmpeg you can output the available decoders with ffmpeg -encoders. With the ffmpeg version that was compiled for homebrew, you’d see something like this when limiting the output to entries with toolbox
$ ffmpeg -encoders | grep toolbox
ffmpeg version 6.0 Copyright (c) 2000-2023 the FFmpeg developers
  built with Apple clang version 14.0.3 (clang-1403.0.22.14.1)
  configuration: --prefix=/opt/homebrew/Cellar/ffmpeg/6.0_1 --enable-shared --enable-pthreads --enable-version3 --cc=clang --host-cflags= --host-ldflags= --enable-ffplay --enable-gnutls --enable-gpl --enable-libaom --enable-libaribb24 --enable-libbluray --enable-libdav1d --enable-libmp3lame --enable-libopus --enable-librav1e --enable-librist --enable-librubberband --enable-libsnappy --enable-libsrt --enable-libsvtav1 --enable-libtesseract --enable-libtheora --enable-libvidstab --enable-libvmaf --enable-libvorbis --enable-libvpx --enable-libwebp --enable-libx264 --enable-libx265 --enable-libxml2 --enable-libxvid --enable-lzma --enable-libfontconfig --enable-libfreetype --enable-frei0r --enable-libass --enable-libopencore-amrnb --enable-libopencore-amrwb --enable-libopenjpeg --enable-libspeex --enable-libsoxr --enable-libzmq --enable-libzimg --disable-libjack --disable-indev=jack --enable-videotoolbox --enable-audiotoolbox --enable-neon
  libavutil      58.  2.100 / 58.  2.100
  libavcodec     60.  3.100 / 60.  3.100
  libavformat    60.  3.100 / 60.  3.100
  libavdevice    60.  1.100 / 60.  1.100
  libavfilter     9.  3.100 /  9.  3.100
  libswscale      7.  1.100 /  7.  1.100
  libswresample   4. 10.100 /  4. 10.100
  libpostproc    57.  1.100 / 57.  1.100
 V....D h264_videotoolbox    VideoToolbox H.264 Encoder (codec h264)
 V....D hevc_videotoolbox    VideoToolbox H.265 Encoder (codec hevc)
 V....D prores_videotoolbox  VideoToolbox ProRes Encoder (codec prores)
I’m interested in encoding with H.265 so I’m using hevc_videotoolbox. For comparison: On a a NVIDIA GPU you can use hevc_nvenc instead.
Encoding test videos
I mainly used my own videos for the following process, but to show what’s happening I also did it with “Tears of Steel”, a Creative Commons Attribution 3.0 licensed short movie by the Blender Foundation (mango.blender.org). This way I can use screenshots and videos for this post.
The original video in 4k is 12 minutes and 14 seconds long and I extracted 30 seconds of it like this
ffmpeg -i input.mov -ss 00:06:00 -t 30 -c:a copy -c:v copy 30seconds.mov
Then I started the encoding with different quality settings. Doing this manually would look like this:
ffmpeg -i 30seconds.mov -c:v hevc_videotoolbox -q:v 5 -c:a copy -tag:v hvc1 output-q1.mp4
ffmpeg -i 30seconds.mov -c:v hevc_videotoolbox -q:v 10 -c:a copy -tag:v hvc1 output-q5.mp4
ffmpeg -i 30seconds.mov -c:v hevc_videotoolbox -q:v 15 -c:a copy -tag:v hvc1 output-q10.mp4
ffmpeg -i 30seconds.mov -c:v hevc_videotoolbox -q:v 20 -c:a copy -tag:v hvc1 output-q20.mp4
ffmpeg -i 30seconds.mov -c:v hevc_videotoolbox -q:v 25 -c:a copy -tag:v hvc1 output-q30.mp4
[...]
So now I have a 30 second clip for each quality setting
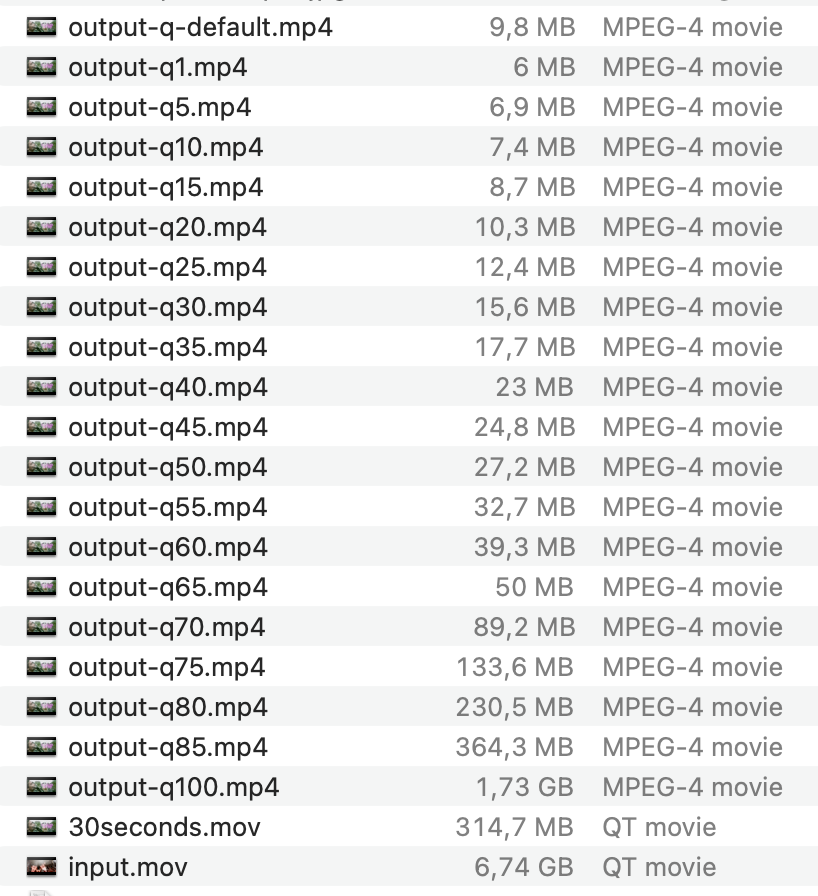
Notice that after 80% quality the resulting video is larger than the source. And 100% quality went from 317 MB to 1,73 GB 😳. Obviously the quality can’t improve beyond the source video.
Then I wrote a quick and dirty bash script:
#!/bin/bash

x_values=("03" "08" "19")
y_values=("1" "5" "10" "15" "20" "25" "30" "35" "40" "45" "50" "55" "60" "65" "70" "75" "80" "85" "100")

for x in "${x_values[@]}"; do
  for y in "${y_values[@]}"; do
    input_video="output-q${y}.mp4"
    output_image="sec${x}-q${y}-output.jpg"

    ffmpeg -i "$input_video" -ss "00:00:${x}" -vframes 1 -qscale:v 2 "$output_image"
  done
done
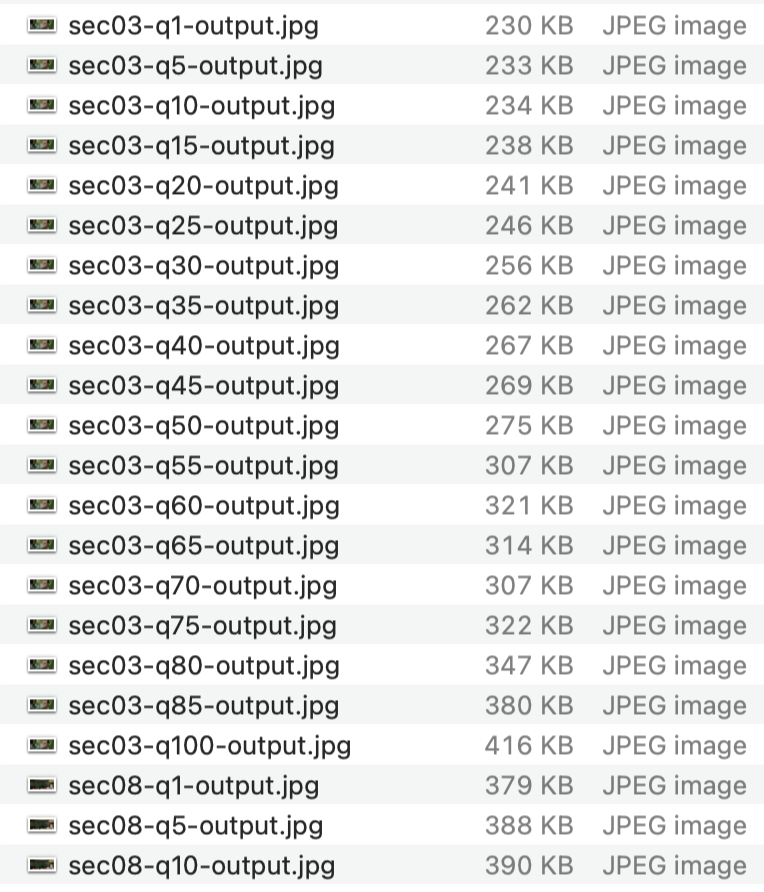
For my test I did it with uncompressed bitmaps, but those are 20MB each. I want to share the results here, so I used qscale 2 which is a very high quality value for jpgs, which is sufficient for checking the results.
So this script extracts a frame from second 3, 8 and 19 from each of the videos with different quality settings.
 […]
[…]
And with the preview in Finder (key: space) you can quickly switch between the pictures with arrow up / arrow down. This way I got a really good impression on when I don’t notice a difference anymore.
For my own videos that was 45% most of the time. The changes between 35% and 45% were already minor. In some frames I could see a difference from 45 to 50, and if I really paid attention and looked real close I saw minor changes between 50 and 55. But nothing I’d notice from a normal distance.
As you can see here I’m zoomed in, and there is a big difference between quality 5 and 50.
(Same image as in the beginning)
Conclusion
Avoid using the default quality (meaning: use -q:v). I don’t know what it is exactly but judging from the file size the default quality must be between 15% and 20%.
From my private videos I never had a case where I noticed a change after 50%. This is subjective of course.
If you check the quality after encoding: Search for parts with a lot of motion. This is where I first saw differences in lower quality settings.
So I checked the file differences. For the whole short film it looks like this:
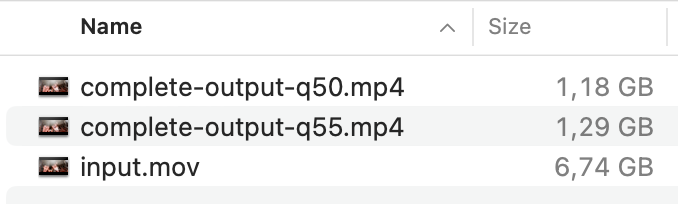
Although I didn’t notice a difference beyond 50%, I have decided to use 55% just to calm the nerves if I one day decide to delete the old H.264 footage.
I’ll leave my test files + output online for some time, if you want to compare for yourself
This is the link to the archive with the extracted frames, so you can quickly switch between frames with different qualities locally:
https://f.27p.de/b/00016-ffmpeg/frames.zip
The ffmpeg command
This is what I’ll use to convert my videos:
ffmpeg -i input.mov -c:v hevc_videotoolbox -q:v 55 -tag:v hvc1 -c:a aac -b:a 128k output.mp4
-i input.mov- input file
-c:v hevc_videotoolbox- hardware encoding
-q:v 55- Quality 55
-tag:v hvc1- Apple being apple, they need a special tag to open it in QuickTime etc.
-c:a aac- optional: use AAC audio
-b:a 128k- optional: specify the audio bitrate (this is just because I want to have the same bitrate for every video)
output.mp4- output file
Time
The reason why I’m using a hardware decoder is that it’s much faster. Here a comparison for encoding the 30 second source video
CPU
ffmpeg -i 30seconds.mov -c:v libx265 -crf 22 -tag:v hvc1 -c:a aac -b:a 128k time-output-crf22-software.mp4

[...]

encoded 723 frames in 286.54s (2.52 fps), 7813.58 kb/s, Avg QP:25.60
videotoolbox
ffmpeg -i 30seconds.mov -c:v hevc_videotoolbox -q:v 55 -tag:v hvc1 -c:a aac -b:a 128k time-output-q55.mp4

[...]

frame=  723 fps= 64 q=-0.0 Lsize=   31756kB time=00:00:30.08 bitrate=8647.5kbits/s dup=3 drop=0 speed=2.66x

#(hevc_videotoolbox doesn't show the time, it was 11-12 seconds)
30 second footage: 287 s vs 12 s on a M2 Pro (10-core CPU/16-core GPU) 🧐
I hope this information will assist someone in deciding which quality setting is the most suitable. If you have some more insights, feel free to contact me via one of the socials below, so I can update this post.